Managing IP SLA System Tests
The “IP SLA System Tests” dialog is used to manage the IP SLA system tests—adding, removing, editing and copying tests can be performed in this dialog. The IP SLA System Tests dialog can be accessed from the following places using the “Manage IP SLA System Tests” menu item:
The IP SLA main menu
Device right-click pop-up menu in the IP SLA system topology view
The IP SLA submenu in the device tree right-click pop-up menu
The IP SLA system topology view toolbar
Add Test
The “Add Test” button starts the “IP SLA System Test Creation” wizard.
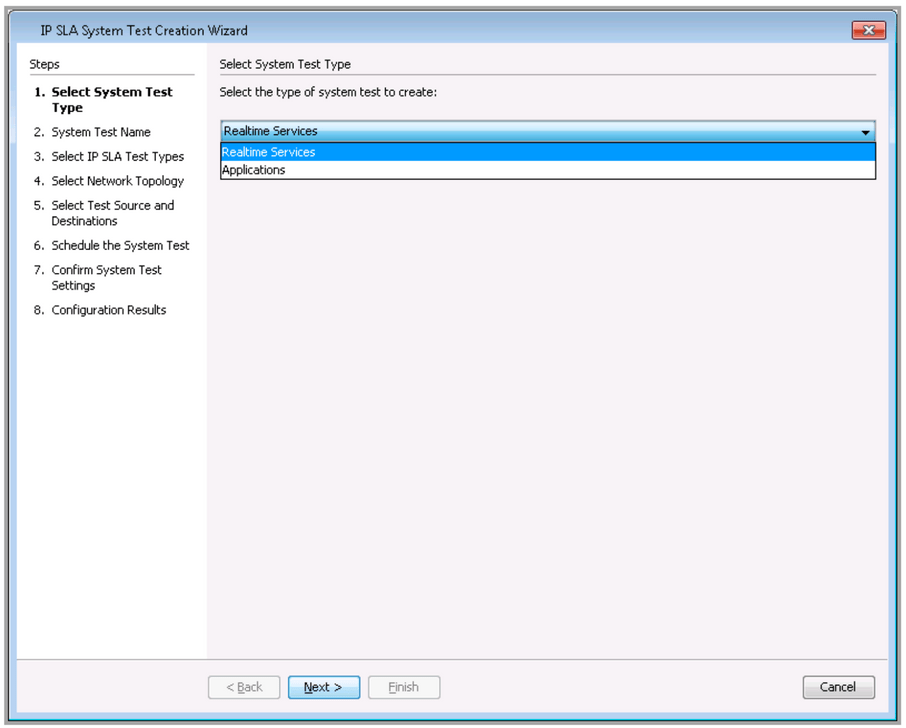
Select System Test Type
Two types of IP SLA system tests can be set up: Real-time Services and Applications. Each type of system test provides different options for the types of IP SLA tests that can be run and the network topologies that can be used.
System Test Name
Step 2 allows you to specify a name for the IP SLA system test. When individual IP SLA tests are configured on the devices, this name will also be used in the IP SLA test tag field.
Select IP SLA Test Types
Different system tests allow for different IP SLA test types. For each test type, a specified number of test instances can be set up. All test instances will use the same settings with the exception of tests that use port numbers. For those tests, an attempt can be made to use unique port numbers for each test instance. LiveNX will attempt to use select ports from the range defined in this step—the default port range is 5000 to 50000. The wizard will attempt to detect already used ports by looking at all of the other IP SLA tests configured on the devices. The wizard is not currently capable of detecting ports used by the devices that are not specified in configured IP SLA tests, such as a device Web server.
Real-time Services Test
• Jitter
• Video
Applications Test
• DHCP
• DNS
• ICMP Echo
• FTP
• HTTP
Select Network Topology
This step allows you to select the network topology used in the tests.
Mesh: All connections are bidirectional between devices
Hub and Spoke: Options to use bidirectional, hub to spoke, and spoke to hub connections
With application system tests, only “Hub and Spoke” with hub to spoke connections is available.
Select Test Source and Destinations
Depending on the system test type and topology, different device selection options will be available:
Real-time Services with Mesh Topology: Selection of all devices to be used in the test
Real-time Services with Hub and Spoke Topology: Selection of a single hub device and one or more spoke devices
Application (only Hub and Spoke are supported): Selection of one or more hub devices. The spokes are determined by the destinations specified when the IP SLA test types are selected.
NOTE: All IP SLA capable devices specified as destinations for the real-time tests will be set up as an IP SLA responder and that setting will not be removed when the IP SLA system test is removed.
Schedule the System Test
This step allows you to schedule when IP SLA system tests will run. The following options can be configured:
Start Time – you can now configure tests to run now, on a specified date, at a specified time, or after a specified period of time elapses.
Frequency – the amount of time after which each IP SLA operation is restarted.
Life – the amount of time the test actively collects information. You can configure tests to run non-stop, or for a specified duration.
Age Out – the amount of time to keep the test in memory when it is not actively collecting information. You can set data to expire after a specified time.
IP SLA System Tests do not support the frequency range setting, because the same settings should be used for all devices participating in the IP SLA system tests and some older devices/IOSs do not support the frequency setting.
Confirm System Test Settings
On this step, the device configs are reloaded so LiveNX can determine how the IP SLA tests should be configured on the devices. A summary of the IP SLA system test settings is shown, including which port numbers will be used.
• Clicking the Preview CLI button displays commands that will be sent to the devices to configure the IP SLA system tests.
• Clicking the View Errors button will show any errors that occurred while loading a device config.
• Real-time services tests, the Fine Tune button allows you to manually override port number values.
Configuration Results
This step shows a list of devices that are part of the IP SLA system test. Successfully configured devices will have a green icon next to them and red icons will appear next to devices where a configuration problem occurred.
The View Errors button is used to view the errors that occurred. After clicking Finish, the IP SLA system test is saved in the application.
Remove Test
Clicking the Remove Test button displays the Remove IP SLA System Test dialog. When the dialog box opens, the config models of all of the devices will be reloaded to confirm which commands need to be sent to the devices. A gray icon indicates a successful read. A red icon indicates an error.
Clicking the Preview CLI button displays the commands that will be used to remove the system tests. When reading the config models, a gray icon indicates a successful read and red indicates an error. Any errors that occur can be viewed using the View Errors button.
Clicking the OK button removes the IP SLA tests from the devices. If any configuration errors occur when removing tests, they will appear in a new dialog box. The Cancel button cancels the removal and closes the dialog box.
NOTE: Multiple tests can be selected for removal.
Edit Test
Clicking the Edit Test button opens the wizard and allows you to edit the system test.
NOTE: When editing a test, the test type cannot be changed.
Copy Test
Clicking Copy Test opens the IP SLA System Test Creation Wizard pre-populated with the settings of the selected test. The name of the test copy is automatically modified to avoid conflicts with the original.